- 목차
merge태그와 include태그 소개
안드로이드의 레이아웃의 멋진 기법으로
include와 merge 라는 것이 존재한다
공식홈피와 블로그에서도 소개해놨따
http://developer.android.com/training/improving-layouts/reusing-layouts.html
http://android-developers.blogspot.kr/2009/02/android-layout-tricks-2-reusing-layouts.html
또한 요런 사이트도 있다
안드로이드 merge의 단점 (일어)
일어지만 중국어나 아랍어가 아닌게 어딘가
몰라도 상관없지만 알면 매우 편리한 기법이라고나 할까..
나 같은 귀차니즈머한테는 특히나..
include 태그
똑같은 태그를 또 쓰는 걸 좋아하는 사람은 없을 것이다
그래도 메뉴라거나 할려면 어쩔 수 없다
리스트뷰라면 뷰를 복제복제 해주니 나름 편한데 그런 방법이 없을까
라면 뭐.. 뻔하게도 include 다
마구 써야할 뷰를 하나 정의해주고
그것을 include 태그에 넣어주면 쿠킹완성
예를들어보자

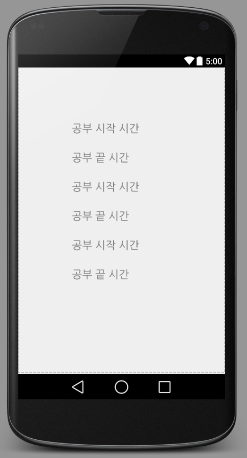
이런 화면을 만들어 줄려면
TextView를 여섯개나 도배해야한다. 근데 패턴이 있다
시작과 끝 시간.. 그럼 저것을 따로 만들어 보자
<?xml version="1.0" encoding="utf-8"?>
<RelativeLayout
    xmlns:android="http://schemas.android.com/apk/res/android"
    android:layout_width="match_parent"
    android:layout_height="wrap_content"
    >

    <TextView
        android:id="@+id/txt_startTime"
        android:layout_width="wrap_content"
        android:layout_height="wrap_content"
        android:layout_marginBottom="30dp"
        android:text="공부 시작 시간"
        android:textSize="20dp"
        />

    <TextView
        android:id="@+id/txt_endTime"
        android:layout_width="wrap_content"
        android:layout_height="wrap_content"
        android:layout_below="@id/txt_startTime"
        android:layout_marginBottom="30dp"
        android:text="공부 끝 시간"
        android:textSize="20dp"
        />
</RelativeLayout>
custom_timeset.xml

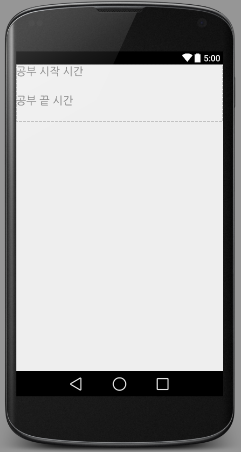
이렇게 된다.
이걸 include를 사용해서 마구 붙여주면된다
<?xml version="1.0" encoding="utf-8"?>
<LinearLayout xmlns:android="http://schemas.android.com/apk/res/android"
              android:orientation="vertical"
              android:layout_width="match_parent"
              android:layout_height="match_parent"
              android:padding="100dp"
    >
    <include
        android:id="@+id/include_layout"     <!-- 아이디 설정 가능 -->
        android:layout_width="match_parent"
        android:layout_height="wrap_content"
        layout="@layout/custom_timeset"      <!-- xml을 적는데 주의점 android빼고 -->
        />
    <include
        android:id="@+id/include_layout2"
        android:layout_width="match_parent"
        android:layout_height="wrap_content"
        layout="@layout/custom_timeset"
        />
    <include
        android:id="@+id/include_layout3"
        android:layout_width="match_parent"
        android:layout_height="wrap_content"
        layout="@layout/custom_timeset"
        />
</LinearLayout>
올ㅋ

이렇게 되었다
결국.. ViewGroup을 따로 만들어놓고는 재활용하는 것이다
여기서 id가 어떻게 되는 것인지 궁금할 수가 있다
View include01 = findViewById(R.id.include_layout);
View include02 = findViewById(R.id.include_layout2);
View include03 = findViewById(R.id.include_layout3);

TextView tv1 = (TextView) include01.findViewById(R.id.txt_startTime);
TextView tv2 = (TextView) include01.findViewById(R.id.txt_endTime);
TextView tv3 = (TextView) include02.findViewById(R.id.txt_startTime);
TextView tv4 = (TextView) include02.findViewById(R.id.txt_endTime);
TextView tv5 = (TextView) include03.findViewById(R.id.txt_startTime);
TextView tv6 = (TextView) include03.findViewById(R.id.txt_endTime);
이런식으로 사용하면 된다
id가 겹치지만 윈도우에서 A폴더 B폴더 이름만 다르면 각 폴더안 내용물의
이름이 같아도 상관없는 것처럼 상위 뷰계층의 id안에서 findViewById를 하기에
문제가 없다
하지만 위에 보는것과 같이 코드가 더 추가되며
include 를 함으로써 뷰계층이 깊어진다
merge 태그
include를 쓸려면 반드시 감싸줄 ViewGroup이 존재해야만 한다
하지만 그것은 한편으론 뷰계층을 더 깊게하여 부하를 가중 시킨다
항상 레이아웃 디자인에 있어서 레이아웃의 중복은
좋지 않다.
그것을 위해서 나온것이 merge 태그로써
위에서 RelativeLayout 대신에 merge를 사용할 수 있다
<?xml version="1.0" encoding="utf-8"?>
<merge
    xmlns:android="http://schemas.android.com/apk/res/android"
    >
    <TextView
        android:id="@+id/txt_startTime"
        android:layout_width="wrap_content"
        android:layout_height="wrap_content"
        android:layout_marginBottom="30dp"
        android:text="공부 시작 시간"
        android:textSize="20dp"
        />
</merge>
이렇게 되면 include 되는 순간 merge 태그는 사라지고
그안의 내용물만 바로 붙여지게 된다
include의 최대 단점이 사라지게 되는 것이다
대신 merge의 슈퍼울트라 단점이 있는데
merge는 뷰 그룹을 생성하지 않음으로써 include와 달리 id 사용이 제한적이다
무슨 소리냐면
View include01 = findViewById(R.id.include_layout);
여기서 include01 이 NULL로 떨어진다는 것이다
아까 말했듯이 merge 태그가 사라짐으로써 include 할때 붙여주는 id도 함께
날아간다. 그렇게 되면 붙여주는 include 마다의 구분이 사라지게됨으로써
각 merge 의 내용물 뷰 역시 같은 id로 둘 수 없게된다
결국 include와 똑같은 효과를 볼려면
merge 로 만드는 뷰도 3개 만들어야한다는거..
노가다를 줄인답시고 하는건데 노가다가 배로 늘어버린다 -_-
그럼 왜 이런 정신나간 태그가 존재하는가
이 경우는 같은 xml이 아니라 각각의 xml에서
똑같은 형식이 딱 1개! 만 필요할때 써주면 편하다
즉, 액티비티가 5개 있는데
각 액티비티마다 무시무시한 분량의 태그가 있는데 그것이 똑같이 생겼다면
merge로 만들어두고 각각 하나씩 붙여주면 되는 것이다
여기서 또하나 ViewStub 이라는게 있는데 걍 없는셈 치자 ^^
잘 쓰지도 않는거…
Written with StackEdit.
글 재밌게 쓰시네요. 잘 보고 갑니다.
답글삭제많이 배웠습니다
답글삭제merge 이해하고 갑니다~
답글삭제